Tuesday, December 31, 2013

Whipped Ganache "Rocher-Style" Truffle Bombs


Whipped Ganache "Rocher"-Style Truffle Bombs

crunchy salted almonds, crisp snappy dark chocolate coating with smooth fluffy  whipped ganache surprise inside.


i must admit...these where an unexpected accidental delicious truffle treat.  i had a huge bowl of dark chocolate ganache frosting in the fridge and no cake...hmmmm...chocolate will not go to waste in this house.  i'll make truffles.
the interior, as you can see, is simply the whipped ganache.  the same you might use for frosting something like the unbelievable Black Magic Cake.  by the way...do check out the cake, it's a must for chocolate lovers.  with a quick dip in some tempered chocolate, a little roll in salted almonds and you're golden.  you've conquered the ultimate truffle.

if there's someone special, someone to impress or you're just in the mood for chocolate...suit up...put your creative hat on and give these a try.  put your own flavors together and see what delicious little ball of chocolate you can create.


WHIPPED GANACHE FROSTING 
or INTERIOR FOR ROCHE STYLE TRUFFLES

8 oz Guittard 70% bittersweet coverture chocolate discs
8 oz heavy cream
you could add an extract, a little cinnamon, some spice etc... if you want a different flavor other than pure chocolate.
NOTE...you can make as much as you want with a 50-50 ratio of chocolate to heavy cream.

heat heavy cream in a small sauce pan.  bring to a boil, remove from heat and pour directly into and over the chocolate.   allow to sit for 1 minute.  start to gently stir from the middle.  take your time.  you will see it magically come together with a beautiful shine.  stir until you have it all incorporated.  let sit on the counter for at least 45 minutes.  you are looking for a pudding consistency and ABOUT 70 DEGREES.  if you need to speed it up, refrigerate and stir every 10 minutes until pudding consistency.  put this in the bowl of a stand mixer with whisk attachment.  start slowly and move the speed up to high.  you will see that it forms soft peaks after one minute.  keep a close eye so you DON'T OVER WHIP.  watch it until it gets just a bit more firm. you want frosting consistency.  do not over whip or you will end up with chocolate butter.  
NOTE...as stated...this was originally a frosting recipe that i stuck in the fridge.  i found the frosting recipe with some great visuals at Joe Pastry.com so please check out his helpful photos for the correct frosting consistency.

refrigerate until set.
these are a bit more difficult to ball up than a regular smooth ganache truffle...a little messy, but doable.  definitely worth the effort.  when ready to roll...use thin rubber gloves and a spoon or small scoop.  the ganache might seem "crumbly".  do the best you can to make a ball.  remember, the more you handle it, the more it will melt.  i like to quickly press the ball together with my finger tips.  make small balls and refrigerate while preparing chocolate for dipping.

MISE EN PLACE !!!

COVER YOUR WORK SURFACE
CHOP ROASTED SALTED ALMONDS
PREPARE COOKIE SHEETS WITH PARCHMENT
TEMPER YOUR CHOCOLATE
check link HERE for my instructions.
i use the easy microwave method similar to Alton Brown's seen HERE, but have adapted it slightly.  (Alton is thorough, but tends to complicate things sometimes.)
NOTE...i have only tempered 16 oz (1 lb.) of chocolate.  i am not a master, but any less might not come out perfect.  1 pound of chocolate will be too much for just these truffles.  SO...always have extra stuff (like nuts, cookies, chips, pretzels) or more truffles to dip and have fun with.  let no chocolate go to waste.

remove balls from fridge.  let them sit out for just a moment to take the chill off.  there is a fine line between cold and cool.  if too cold they with expand and crack after dipping and the outer layer has set.  if too warm they will loose shape.  

dip each ball in tempered chocolate.  lift out of chocolate with a fork, tap off excess and drop into bowl of chopped almonds.  carefully cover the whole thing and gently place on parchment
OR...you can place these into mini cupcake papers and sprinkle more almonds on top.

BIG NOTE...i was in a hurry so for the last few so i took a short cut.  i sprinkled a few almonds in the bottom of the mini paper cups, dropped the chocolate coated truffle in the cup and sprinkled almonds on top.  these are not shown here.  they're not quite as uniform, some almonds spill while eating, but it definitely did the trick, looked fabulous and tasted delicious.

Happy new year!

I haven't had time to prepare an elaborate end of the year post. No "best of", no resolutions. I might have the time in a few days - or not. I have high hopes for 2014, and I hope to blog more often than Ihave this past year, but the truth is that the blog is a smaller part of my life at the moment. And that's ok. 

I wish all my readers a fabulous new year, with lots of love and great food!

Dante and I, dec 30, 2013

Sunday, December 29, 2013

Gooey Saffron Cake

Untitled

I served this cake as our dessert for Thanksgiving. It was excellent -  very simple to make ahead of time, and very, very appreciated. It's very sweet, but serving raspberries along with it cuts some of the sweetness and brings in a nice counterpoint. It feels christmas-y but not over the top.

Gooey Saffron Cake
serves 10

125 g butter
100 g white chocolate, finely chopped
0,5 g saffron (1 sachet)
250 ml (1 cup) sugar
120 g flour
3 tbsp vanilla sugar (or powdered sugar and the seeds from 1/2 vanilla bean)
100 g almond paste, coarsely grated
1/4 tsp salt
3 eggs

Start by melting the butter and white chocolate. Add the saffron.

In a medium bowl, mix sugar, flour, vanilla sugar, almond paste and salt. Add the saffron-butter mixture and stir well. Add the eggs, and mix well.

Pour into a buttered springform pan, mine is about 24 cm across, and bake at 175°C for about 20-25 minutes. It should still be a little gooey in the center, so don't overbake it!

Let it cool, then remove from the pan and on to a plate.

Serve with raspberries, warmed with a few spoonfuls of sugar, and fluffy whipped cream

Monday, December 23, 2013

Happy Holidays!


Saturday, December 21, 2013

Pancake party!


One of our latest gadgets! It's called the Tefal Crepe Party, and it's basically a table-top pancake maker. So convenient! Dagmar has one of these and has treated us to pancake parties on several occasions, and then I decided to just get one of my own. 

You make the batter, as usual - I used three eggs, 300 ml flour, 600 ml milk, a little pinch of salt and then about two tablespoons melted butter. I did this ahead and let it rest in the fridge for a few hours. Then just let the pan heat up, and start making pancakes! 

We served them with all sorts of toppings - crème fraiche, maple syrup, homemade jam, sliced bananas, toasted walnuts and yummy apple wedges fried in butter and cinnamon. 

Friday, December 20, 2013

The Christmas Ham

julskinka2011

Swedish christmas ham is an absolute must on every christmas table. I know families that go through two or three hams during a holiday season, since they eat it sliced on sandwiches every morning - with lots of Swedish strong-sweet mustard. Me, I'm not a huge fan, but I do like a slice or two. (But hold the mustard.)

My ham this year isn't done yet - it's an old photo - but it's from Scan (a christmas gift - thanks!) and it's from a canola-fed pig, rapsgris. I've had those before and they're awesome. I have very high hopes for this one, too.

The mustard you use by the way - it's special. It's certainly nothing like the yellow American stuff, or dijon for that matter. It's strong, it's spicy, it's sweet, and it's pretty grainy. It has a lot of vinegar, and a lot of sugar, too. I have no idea where to get it outside of Sweden - IKEA, I presume?

So. Get a ham. Either a pre-boiled one, as most seem to do these days (I know I certainly did) or a salted one that you boil or bake yourself. Cut off any visible fat. Or don't. Preheat oven to 225°C. Take three tablespoons of hot, sweet grainy mustard, and one egg. Beat vigorously together until you have a uniform, silky mixture. Brush this over the top of the ham. Sprinkle over breadcrumbs - loads and loads of breadcrumbs - and press them into the mustard.

Bake in the oven for fifteen minutes, watch closely so it doesn't burn.

That's it! Eat cold, in thin slices. Will keep well in the fridge for quite a while, wrapped in foil.

Thursday, December 19, 2013

Coconut Curry Lime Dark Chocolate Truffle Bites


STAY-CATION?
are you stuck at home this holiday?...or know someone who isn't vacationing this season?
let chocolate take you somewhere, even if it's just for that one fleeting get-away moment.

TRUFFLES...
smooth dark chocolaty ganache...
perfect for gift exchange, dinner parties, hostess gifts or a simple quiet moment alone.

FOR THESE ASIAN TROPICAL TRUFFLES...a slight hint of coconut curry with a touch of fresh lime zest...
add a few roasted, slightly salty coconut chips from Trader Joe's and you'll have some unexpected flavors all come together for a delicious warm, yet refreshing dark chocolate bite.

please visit my index or the search box in the right hand column  and type in "truffles" for more delicious chocolate get aways.


COCONUT LIME CURRY DARK CHOCOLATE TRUFFLE BITES

8 oz dark chocolate
zest from 1 1/2 limes
1/2 cup plus 1 Tbsp coconut milk
1/2 to 3/4 tsp coconut extract, depending on quality and taste
1/2 to 3/4 tsp Madras curry powder, depending on quality and strength
NOTE...these are dairy free, but heavy cream works great

prepare a square or rectangular vessel with saran or tinfoil.  see photo below for example.

these are room temperature stable, but should be stored in the refrigerator.
chop chocolate in small, small pieces.  no large chunks....set aside in heat resistant bowl.
heat coconut milk(cream) in a small sauce pan.  bring to an almost boil, stirring to keep even heating...bubbling around the sides is a good sign.

add milk(cream) mixture to chocolate. 
very gently use a fork or skewer to disperse the hot milk into the chocolate.  do not stir at this point.  just gently prod around to remove any pockets of chocolate that might be stuck together or the bottom of the bowl.  let sit for a minute.  now begin to stir from the middle.  the ganache should start to come together from the middle.  start to incorporate the whole thing.   do not stir vigorously "YET".  just gently stir around and through until combined.  when it looks like all the chocolate lumps have melted in...add in the coconut extract, lime zest and curry powder, stir well...do a TASTE TEST...do you need more coconut, more curry, more zest?
now you can break out the whisk.  important...just whisk to incorporate and emulsify.   the whisk is OK for truffles, but DO NOT WHIP or you will end up with a frosting consistency.  you want it still pourable.  do this gently by hand, not a stand mixer.  whisk until fully emulsified.  the ganache will thicken ever so slightly.    pour into prepared dish/tupperware.  tap the container on the counter a few times to even it all out.  put this in the fridge and it should be ready in about 35-40 minutes.
 UNCOVERED until it is fully set.

above is an example using tin foil in an 8" x  5" tupperware (with a flat bottom)...i now prefer using heavy saran.  NOTE that this looks grainy on top because i sprinkled this batch with flaked sea salt before it was almost set.  this recipe does not need the salt due to the slightly salty coconut chips.

the whole block should lift out of the container.  remove the saran or aluminum and cut into squares or desired shape.  you might want to clean the knife between slices.  have a small bowl of cocoa powder and coat all sides.....DONE
except the top...leave clean for coconut chips to adhere.


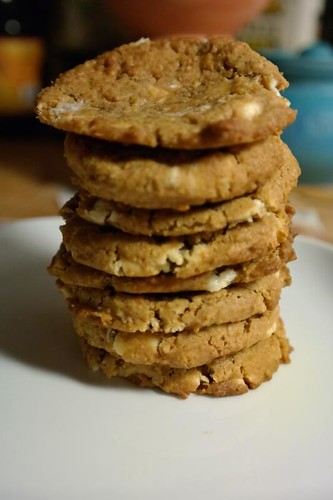
Molasses Oatmeal White Chocolate Chip Cookies

oatmeal-whitechoc-cookies

I keep bookmarking blog posts, meaning to try out recipes. I keep forgetting, though. But this recipe, by Peabody, didn't have to sit around for very long. I loved the sound of a cookie with both oatmeal and molasses. Well, I didn't exactly use molasses, though. I used a dark syrup, with some malt, and hey, that turned out great too.  I bet using golden syrup would make a completely different, but still delicious cookie.  I changed a few other things as well, so please head over to Peabody for the original recipe.

It's perfect for the holidays - and it can be frozen in cookie dough balls, so you can just bake up as many as you'd like. The best way to always have freshly baked cookies! I baked up a big batch this morning, to give to the boys pre-school teachers. I hope they like them!

(Molasses) Oatmeal White Chocolate Chip Cookies

300 g flour
250 ml rolled oats
1 tsp ground ginger
1 tsp cinnamon
1 tsp baking soda
1/4 tsp salt
165 g butter, at room temperature
150 g brown sugar
125 ml molasses/dark syrup
1 egg
1 tsp vanilla extract
250 ml white chocolate chips

Combine flour, oats, ginger, cinnamon, soda and salt in a bowl.

Cream the butter and brown sugar until very soft. Add the molasses, and then the egg and vanilla. Stir in the dry ingredients, and at last, the white chocolate chips.

Scoop out balls, and place in the fridge for a few hours to make them a bit firmer. I freeze mine at this stage. Bake at 175°C for about 10 minutes.

Wednesday, December 18, 2013

Ruddy Duck or Good Things in Small Packages

 The strangest thing happened this morning. I was walking the dogs and my next door neighbor, who I don't know much at all, said, hey want a duck? He had just shot a brace and gave me one. A ruddy duck, so it seems. A diver. He didn't know much about how to clean or cook them. And I just happened to have Hank Shaw's new book Duck Duck Goose on my desk. So I lent it to him. And then wrote to Hank to confirm how it might be cooked. His advice was basically "roll the dice." So I did.

Let me also hasten to add, I have plucked and gutted ducks before. But this girl was so small and soft. Softer than Maxie, who was the softest cat on earth. So it was disconcerting, more so than usual. It took SO long. And then of course I had to share the liver and giblets with the beasts.So I opted to pan roast in duck fat that I had on hand. And then deglaze with zin. I wanted to use port, but this was just sweet enough. Not much else. Salt and Pepper.

She was so sweet and succulent, the flesh as dark as beef. And literally four bites and then a few little nibbles around the legs and the rest. She was so tiny.

And what they say, good things come in small packages, is quite true.

Monday, December 16, 2013

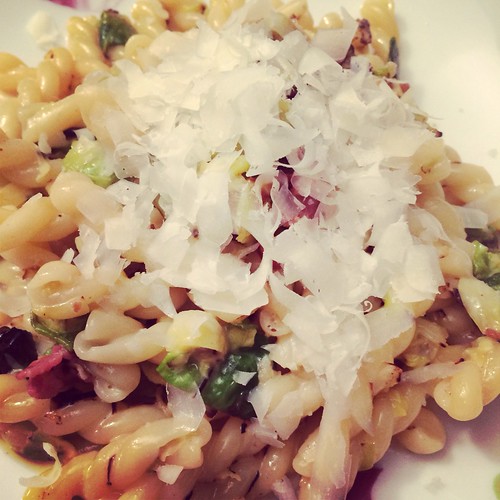
Pasta with Brussel Sprouts, Bacon & Pecorino

Untitled

This pasta is delicious. Somewhat a carbonara, but with charred brussel sprouts, as well as pecorino, in addition to the bacon. I loved it. (Kids? Not.)

Separating brussel sprouts is... surprisingly boring. And it takes a long time. I ended up removing the easy-to-get outer leaves, then finely chopping the cores. It worked out well. My husband complained that I was burning the sprouts, but the recipe really does call for them to be charred so I wasn't worried. It really did give good flavor.

I saw this recipe at Smaskens, who in turn got it from Bon Appetit, and I guess I made something slightly in between.

Pasta with Brussel Sprouts, Bacon & Pecorino
500 g fresh brussel sprouts, leaves separated, the rest shredded
140 g bacon, diced
2 garlic cloves, minced
150 ml cream
4 egg yolks
good handful grated pecorino (plus extra to serve)
500 g pasta
salt
black pepper

Cook the pasta according to package instructions. Meanwhile, start the sauce by heating up a frying pan. It should be really hot. I didn't add any oil. When it's really hot, add the sprouts. Stir-fry for a few minutes - they should get quite a lot of color and soften a little. (They won't release much liquid though, so don't expect that.) Remove to a bowl.

In the same pan, fry the bacon until crisp. Add the garlic and fry for a minute or two. Add back the sprouts, and set aside.

In a small bowl, whisk the yolks with the cream and the pecorino. Add a pinch of salt and a little black pepper.

When the pasta is done, reserve some cooking water. Drain the pasta, and add it back to the pan. Mix in the sprouts and bacon, and then the cheesy yolk mixture. Toss well. Add more pasta water if you want it to be saucier - I added about 250 ml.

Serve right away, and top with extra pecorino.

Saturday, December 14, 2013

Lemon Jerky

This is exactly that: Lemon Jerky. Not slices of lemon dehydrated, which have their own charms. It's six Meyer lemons from my tree picked last year and just left on the shelf, in a warm dry place. Clearly oxidized. Then the peels, hard as shells, and seeds are removed, as well as the membranes. It's not dry, but rather feathery chewy wisps, extremely sour. With a flavor rather more complex than lemon. I'm thinking of cooking it with chicken. Moroccan spices maybe too. Well, who knows?

Friday, December 13, 2013

Quick dinner idea: Chicken in red curry

chickenredcurry

Here's a super quick dinner that's more or less a staple at our house. I serve all the veggies separately so the kids can pick what they want - feel free to add more if you'd like, fried mushrooms or miniature corn are both very good with this.

Chicken in red curry
Serves 4 (generously)

700 g chicken thighs, boneless and cut into small pieces
2 tsp neutral cooking oil
1 tbsp red curry paste (more or less depending on your taste)
1 lemongrass stalk (can be omitted)
500 ml coconut milk (I use an extra creamy kind, but that's not necessary)
salt

steamed rice and veggies to serve -we had red bellpepper, tomatoes, snow peas, thinly sliced red onions and fresh coriander

Heat the oil in a large pot, and fry the chicken for a few minutes on high heat. Add the curry paste and fry for another minute. Add the coconut milk. If using, bash the thick part of the lemongrass with the back of a knife, and add to the pot. Let this simmer while you cook the rice.

Taste, and season with salt. Serve with all the veggies, and salt.


Thursday, December 12, 2013

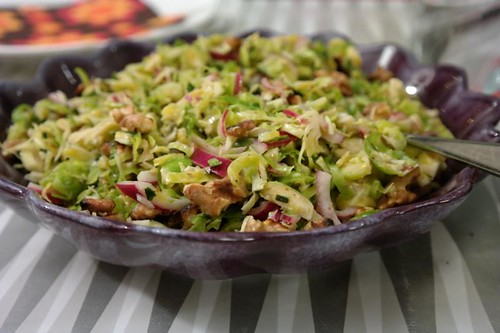
Brussel Sprout Slaw with Walnuts

brusselsproutssalad

I wanted to try a salad with brussel sprouts for thanksgiving - I love brussel sprouts, but already had two very rich side dishes planned, so I wanted something fresh and less heavy. I adjusted the original recipe, which I found here, quite a bit. At the last minute, I realized I wanted to add some dried cranberries but sadly didn't have any. Next time though, I definitely will add those. Another nice add-in would be pomegranate seeds, or even feta cheese.

Be fore-warned: it takes a LONG time to shred brussel sprouts.

Brussel Sprout Slaw with Walnuts
serves 8

500 g fresh brussels sprouts, cleaned
1 red onion, thinly sliced
2 tbsp chives (mine were frozen), chopped
2 tbsp olive oil
1 tbsp maple syrup
1 tbsp white balsamic vinegar
juice of 1 lemon
1 tbsp dijon mustard
salt, pepper
good handful walnuts, toasted and coarsely chopped

Optional mix-ins
dried cranberries
pomegranate seeds
crumbled feta cheese

Start by shredding the sprouts. I did this by halving them, and then finely slicing. It seemed to work ok, the layers separated when I tossed the salad with the dressing. Place in a big bowl. Add the onion, and the chives.

Mix the dressing - olive oil, maple syrup, vinegar, lemon, mustard, salt and pepper. Add to the salad, and toss really well. I massaged it for a bit, to separate the sprouts a little bit more.

You can do this a few hours in advance, just cover in plastic and place in the fridge. Just before serving, taste to see if you want to add more seasoning. I needed to add salt and vinegar. Finally toss in the walnuts. Serve.


Tuesday, December 10, 2013

I Know How Alexander Graham Bell Felt


Sandwich made with this new kind of bread I invented


I am often out of bread. It's a shame but I sometimes don't have time to buy bread or make bread, and then well that's how you get to be out of bread. A while ago I was inspired by Jacques Pepin to try making a quick soda bread in a skillet. He did it on his show and it looked interesting so I did it a few times, but it wasn't great. Soda bread may be suitable for the some uses and I guess for the Irish, but it's a less than perfect substitute for real bread. Sorry the Irish, I speak truth to power. And drunks. And leprechauns.

A principle use for bread in our house is sopping, whether meat juices, barbecue sauce, runny egg, olive oil or soup, bread needs to be sop-worthy, and soda bread disintegrates too readily to sop. Compared to yeast bread, the crumb of soda bread is crumbly rather than spongy, which makes it terrible at sopping. Soda bread also tends to have a firm, craggy outer crust that can be hard and unpleasant to eat. French bread eats better even with a firm crust because the crust has a fine texture and acts like a kind of skin or envelope, holding together whatever you're eating. Soda bread also tends to have lingering aftertaste from the chemical leavening, a kind of baking soda bitterness that seems alien in my mouth. Soda breads are usually made with very little fat, which exacerbates the dry, crumbly texture. All tolled, soda bread is more of a biscuit or muffin than bread, and should probably be reserved for similar uses. Reserved for muffin duty.*

One night when Heather needed soup I made soup. No big deal, I'm on soup like Sinatra on the cigarette girl. Soup is my go-to, I can knock it out eyes closed. But Heather likes bread with her soup for sopping, and we were out of bread. I had been mulling over a couple of modifications to the skillet soda bread that might help with its deficiencies and this was a chance to try them out.

Both the texture of the crumb of yeast bread and the smooth resilience of its outside crust are the result of the gluten protein in the dough. The spongy interior is a web of protein that traps the fermentation gas of the yeast, and the gluten in the skin of the bread stretches as the dough rises and cooks to form a smooth browned exterior. To develop gluten, the protein needs to be teased away from the starch granules in the flour and then interlinked with other protein molecules to form a web. Conventionally, you develop the gluten by kneading the bread and giving it a long time to rise, but there are other ways. If the dough is extra-wet, almost a batter, then the starch molecules more readily free the gluten to do its thing, and if you use high-gluten bread flour rather than all-purpose flour there is more protein available and the gluten quickly becomes elastic. I had a hunch that using a protein-rich medium like eggs or milk to wet the dough also might help form the crumb.**

I decided to make a quick soda bread incorporating all these possibilities to see if it would function more like conventional yeast bread suitable for full bread duty***. I started the liquid medium with a couple of eggs, and when I reached in the fridge for the milk, I spotted a big tub of Bulgarian yogurt we'd bought on a whim at Andy's. Instantly I thought of a couple of reasons I should use the yogurt instead of milk. Yogurt has its milk proteins slightly curdled, concentrating and strengthening them, which might form a protein web with the gluten more readily. Also, the acid in the yogurt could be used to excite baking soda as a leavening agent, providing even more lift. I beat the eggs together with about an equal volume of yogurt. I don't know if Bulgarian yogurt is special, but it's pretty much like Greek yogurt, slightly less liquid than conventional supermarket plain yogurt. I had bought it because what the hell, Bulgarians can use my patronage, their roads are pretty fucked up. I added a couple of teaspoons of sugar and a pinch of salt to offset the tang of the yogurt, and it occurred to me that these three things, the yogurt's sourness, the salt and the sugar could all help to mollify the weird bitterness I associate with chemical leavening.

I melted some butter in a small non-stick skillet, about the size of an omelet pan but green and bought from the as-seen-on-TV store. These little things are great. They have a solid riveted handle, durable non-stick ceramic liner and are of heavier construction than anything else sold on TV. Definitely worth the six bucks or whatever. When the butter was melted I stirred it into the liquid mix and left the pan on the burner to heat.

I eyeballed the volume of the wet mix and made a scant pile of bread flour about the same volume in a small bowl, whisked-in a fat pinch each of baking soda and baking powder, then plopped them into the wet mix and stirred vigorously with a wooden spoon. The dough came together really quickly, and I could tell the gluten was already forming by the way the dough behaved on the spoon. It had the rubbery strands I associate with bread, not the wet, blobby consistency of a batter. The chemistry was also beginning to kick in, and I could sense the dough beginning to lighten and rise, so I got it in the now-hot skillet and quickly flattened it into a disc. One trick I learned from Jacques Pepin's bread was to put a couple tablespoons of water around the perimeter of the bread and cover it to make steam, even out the temperature and encourage the bread to rise rather than settle. I lowered the heat on the skillet to medium and let it rise. In the past when I'd made skillet bread the top had an unappetizing flat color, so I turned on the broiler to remedy that.

After less than two minutes, the bread had risen inside the skillet and looked almost set, so I put the skillet under the broiler to finish, and that turned out to be the magic touch. The crust of the bread rose and smoothed itself, then browned nicely in a couple of minutes. Out from under the broiler, the loaf looked awesome; tight, smooth and nicely browned. I turned it out from the skillet and let it rest on the counter. From outward appearances, it appeared I had just made legit bread in like five minutes. I don't know if I could get as nice a finish by doing the loaf start-to-finish in the oven, but I suppose that's my next experiment. Nah, who am I kidding. If I can make legit bread in like five minutes this way, I'm going to keep doing it this way. Regular bread goes in the oven, this is for when I'm out of bread.

The proof is in the eating, and this bread was terrific. The butter in the mix kept the crumb moist and soft, but the bread had a nice sponge that held together when dunked in soup, and behaved basically like legit bread. The flavor was nice, sweet and slightly eggy, like challah bread or brioche, but I detected none of the creepy chemical quality I was worried about and fuck me, this was great news. I invented a bread. Now I know how Tesla felt when he first drew lighting out of one of his contraptions. Or Thomas Edison. Or Alexander Graham Bell. Or the first guy to do a pick slide to start a solo. Après moi, le déluge de pain frais de la skillet vert.

I was prepared for the bread to fail, but was relieved it had not. Had it failed, my next experiment would have been to try separating the eggs and beating the whites to a foam first, then making a thinner batter with the other ingredients and folding it into the whites, making the lift come from the meringue in the manner of a genoise or other sponge cake. I didn't do that initially because cake crumb is not as stable as bread, and I wanted to avoid making a fall-apart mock-bread. I wanted legit bread.

Emboldened by the success of the skillet bread, I have begun using it for other purposes. The other day H-Bomb (I still call her H-Bomb sometimes, she hates it) wanted a sandwich but guess what no bread. Guess again, pow! five minutes to bread. She only wanted one sandwich, and a full skillet would be too much bread, so I scaled everything back, one egg, one blop of yogurt, smaller pinches of everything I pinched in before, half as much bread flour, and I used a pastry ring inside the skillet to confine the dough and shape the little loaf into a bun**** suitable for sandwich duty. Everything in the bread is scalable. I could probably make a whole sandwich loaf like this.***** (vg)


* Muffin Duty is unfortunately also the name of a series of pornographic films made prior to the Brazilian wax epidemic that embaldened the collective pubis of the adult entertainment industry sometime in early 2006.
** "Form the Crumb," the side-long improv piece on Matching Mole's unreleased third album.
*** New from EA Games, Full Bread Duty, a first-person baker with mass online multibaker features. Epic chat.
**** Into a Bun also a porn franchise, but you probably guessed that.
***** Loaf Like This, the rejected title for a Ralph Records sampler from 1979

Sunday, December 8, 2013

Piquette

Once you have made wine or eau de vie, and after you have pressed out your must, you'll have a lot of skins and seeds. Just add some water and the yeast and remaining sugars will get the whole thing started again. After about two weeks you'll have this interesting slightly sour, lightly alcoholic, grape-flavored drink. If you cap it will even get a little fizzy. Think something between wine, soda and vinegar. It's really fetching. and might even become a little more clear after a few weeks. But it's really pleasant cold. As it is now!!

In Italy this is called aquarello. And it's what you use to make grappa. If this is about 5% alcohol, I think you would get maybe a few cups of white alcohol. But I think the traditional way to drink it is best. After a long time outside in the cold, when you're hot and sweaty and thirsty in December.

Friday, December 6, 2013

Food Friday: Easy Squash Casserole

Today's unique community cookbook is courtesy of my friend Lee Eltzroth at Hunting and Gathering. (Thanks Lee!)


The Northfield Garden Club of Livingston. Favorite Squash Recipes from Garden Club Members is a thin volume with only 15 pages of recipes.  Today's Easy Squash Casserole sorta reminds me of Green Bean Casserole. Heck, maybe you can throw a can of soup on other vegetables, top it with fried onions or cheese and you have a new family holiday tradition.


Note that the recipe calls for the casserole to be baked for 3/4 hours.

Wednesday, December 4, 2013

Chocolate Peanut Butter Caramel Crispy Treat


OH MY !!!

THESE ARE A MUST !!!
holiday or not...these are a HUGE hit!

crunchy, gooey
sweet, salty
THE ULTIMATE RICE CRISPY TREAT
(can be made gluten free)


PERFECT FOR COOKIE EXCHANGE, OFFICE PARTY AND HOLIDAY DESSERT TREAT TRAY.
the recipe can serve a crowd...you might even get 36 squares depending on how you cut them.  the squares can be more like bite size because they pack a flavor punch and just one bite is a mouthful.
i found these on pinterest and knew they would go directly to my "must try" board.
the original recipe comes from Debbie F. at Key Ingredient.  i'm sure these have been made many times over with all sorts of combinations, but i decided to go with a gluten free option.
it dawned on me that "rice" krispies are probably gluten free already, but i wasn't sure they were totally gluten free so i used chocolate crispies from Mother's...sorry i forgot the brand name, but it definitely stated "gluten free" on the box.
i threw some gluten free pretzels in as well to make up the full 7 cups.
NOTE...i am not gluten free, and i am not serving anyone with a severe allergy, so you will want to check all of your ingredients for your particular needs.


CHOCOLATE PEANUT BUTTER CARAMEL CRISPY TREAT...GLUTEN FREE

3 tablespoons of butter
10 0z bag of mini marshmallows
1 Tbsp of vanilla
6 cups of gluten free chocolate crispy cereal
1 cup gluten free pretzels, crushed to small pieces
14 oz bag of unwrapped caramel, i used Werthers
2 Tbsp water
1 1/2 cups peanut butter, divided,,,i used Jiff
12 oz bag of semi-sweet chocolate chips
1/2 cup roasted salted peanuts for the top
NOTE...i threw a few whole peanuts into the rice crispy marshmallow mixture as well...

butter a 9 X 13 inch pan.  also butter the pot and utensils you will be using to melt the marshmallows

place 3 Tbsp. of butter and the marshmallows in a medium saucepan and cook over medium heat, stirring frequently until melted.  when completely melted and smooth, stir in the vanilla.  turn off heat and stir in cereal until completely coated.  the mixture will be VERY sticky.  use buttered hands to press evenly into pan.  mixture should be firmly pressed into pan.  try to have the top even.  place in the fridge to chill.
in another sauce pan (or just quickly clean out the one you were using)...place the caramels and 2 Tbsp of water over low heat, stirring frequently until melted and smooth.  add 1 cup of peanut butter (i suggest store bought like Jiff, not fresh).  stir this mixture until fully incorporated and smooth.  pour the caramel/peanut butter mixture over the chilled rice crispy mixture in the pan.  get it into the corners and as even as possible.  place the pan back into the fridge.
clean your saucepan again and, over low heat, melt the chocolate chips, stirring frequently so as not to scorch or "seize" the chocolate.  LOW HEAT.
when melted, add the remaining 1/2 cup peanut butter, stirring until smooth.  pour this mixture over the chilled caramel layer, spreading to the edges in an even layer.  tap the pan a few times on the counter and give it a jiggle to even out the chocolate layer.  sprinkle on nuts if you choose to and place in the fridge to set for about an hour or until chocolate is firm to the touch.
cut into squares while still firm.
bars are easiest to cut while chilled,
BUT ARE BEST SERVED ROOM TEMPERATURE.


Sunday, December 1, 2013

Utnapishtim the Sourdough Starter

I have not had a starter around for a few months after the summer heat and broken air conditioner, and probably chlorine in the water killed my last one. Let alone a lot of trips. His name is Utnapishtim, only because I was reading a Western Civ paper on Gilgamesh today. It took about two weeks on the counter top, fairly cold in the kitchen. Just flour and water, fed every day. And this dough was raised in about 12 hours which is perfect. Nicely done guys. The bacteria and yeast that is. Cant wait to taste it in the morning.