Wednesday, October 23, 2013

Dark Chocolate Breakfast Bar


CHOCOLATE FOR BREAKFAST !!!
with granola, hickory smoked BACON, espresso beans and pecans

what self respecting chocolate lover doesn't dream about chocolate?

well, now you can wake up, enjoy your chocolate and feel fabulous about the day ahead.

A GOOD DAY STARTS THE CHOCOLATE WAY!


CHOCOLATE IS THE CURE ALL
of course there are health benefits in dark chocolate.  pecans have their omegas, bacon has protein...HA HA...and granola is...granola,
but the best part about chocolate is that "moment"
that feeling that everything is gonna be okay

WHY NOT START YOUR DAY WITH ONE OF THOSE MOMENTS...


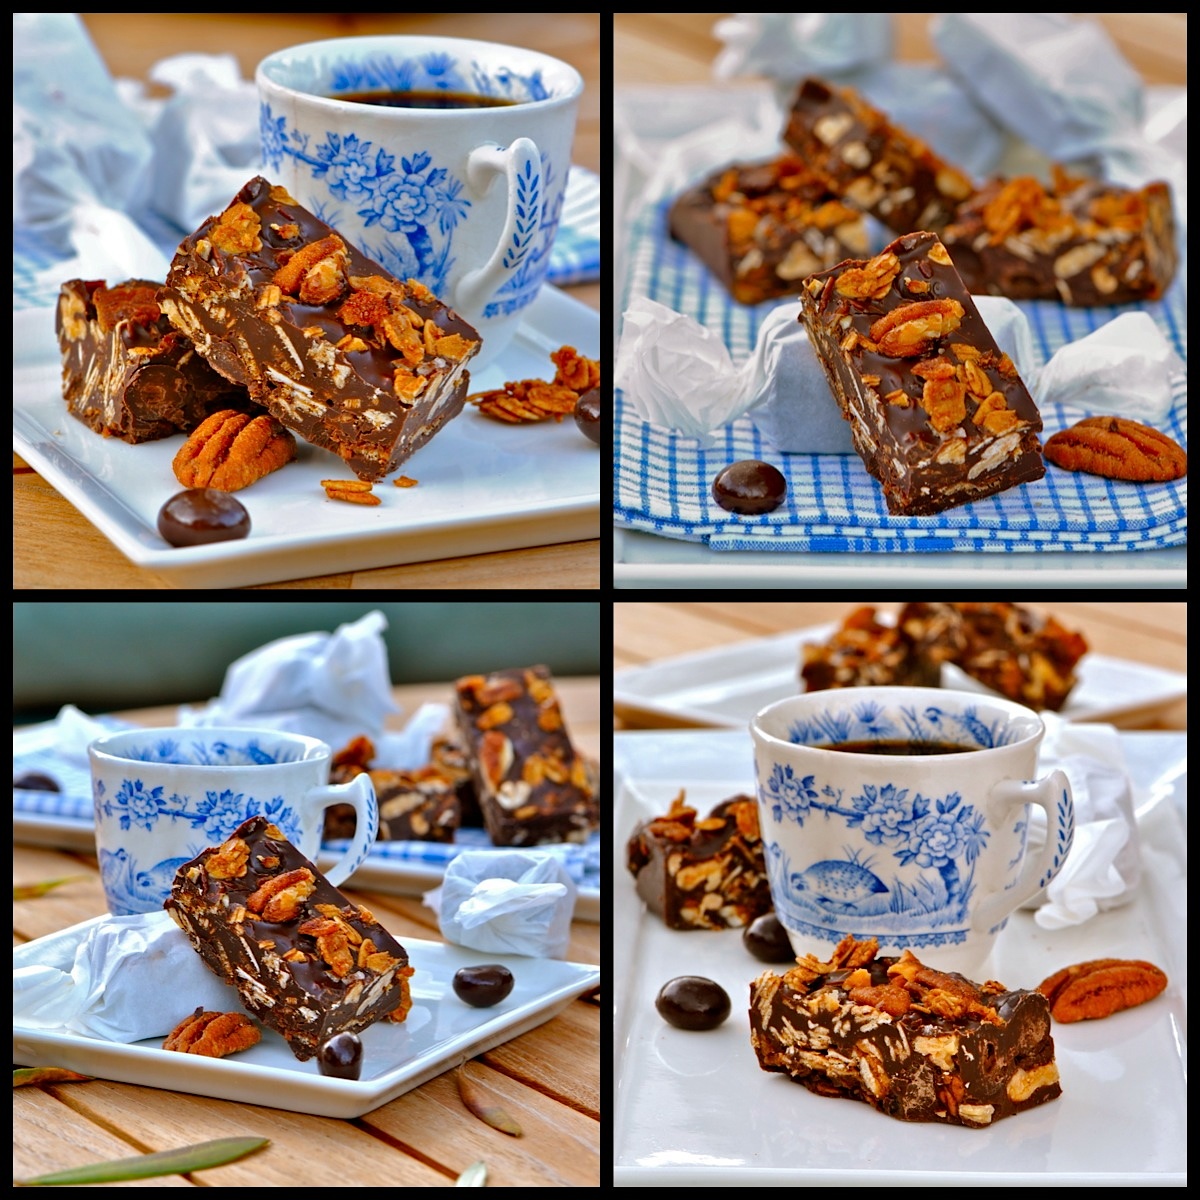
THE DARK CHOCOLATE BREAKFAST BAR

1 pound of good dark chocolate.  i use Guittard 61% coverture discs
BACON...about 8-10 slices cooked crispy and chopped or crumbled
1 1/2 cup of good plain (gluten free) granola
1/2 cup "sweet-spicy" pecans, some cut, some whole.  try Trader Joe's
1/2 cup chocolate covered espresso beans
1/8 cup cocoa nibs
1/4 tsp hickory smoke flavoring in a bottle
1/8 tsp chipotle powder...a little more maybe?
1/4 to 1/2 tsp cinnamon
smoked sea salt for top sprinkle.  try Maldon's flaked

NOTE...have extra goodies (granola, pecans, bacon etc.) on hand in case your mixture looks too "soupy".  ingredient size and shape can vary.

prepare an 8x8 inch square pan.  lightly butter the bottom and sides. this will help hold the parchment to the sides.  line the bottom and two sides with "the parchment sling" (baking tip from Suzie Sweet Tooth).


TEMPER YOUR CHOCOLATE!
this is rather important in my opinion.
tempering keeps your chocolate fresh and snappy instead of a melting blotchy mess.  it will keep at room temperature and be a lot more enjoyable to wrap and give away...TRUST ME.
this is not a hard thing to do.  i think the "microwave method" is easiest.  see my tempering instructions HERE or visit Alton Brown's instructions HERE.
IN A NUT SHELL... you will slowly melt the chocolate, bring it up to 115 degrees (for dark) and slowly lower the temp to 90 degrees before using...but please click on link for instructions.


once your chocolate is tempered and at about 90-91 degrees, start to add in your goodies.  NOTE...save a few bits and pieces for a sprinkle on the top.  when adding in the powdered spices like chipotle, i like to do this through a small strainer for more control.  i wouldn't want one person to get a mouthful of heat...right?
also be very careful with the "hickory flavoring".  this can make or break you.  use a light hand with this for the first time using.  i found that just about 1/4 tsp was good enough.
don't go wild with the mixing or everything will lose it's individual unique flavor, ie...the spicy pecans, the smoky bacon and the cinnamon granola.  you want everything including the dark chocolate to shine on it's own.
pour/spoon mixture into prepared pan.  let sit on counter until solid or put in the fridge.  when set, loosen sides with a knife and lift out by the "sling" handles.
cut into desired pieces with sharp clean knife.

Saturday, October 19, 2013

Acorn Cookies

I think if anyone tasted this out of the blue, the flavor would immediately say: dark chocolate. Even with eyes closed these taste chocolatey. But there's not a drop. It's basically just an ordinary cookie. White and brown sugar, two sticks of butter, cinnamon, vanilla, two eggs, baking powder. Maybe 3 or 4 cups acorn flour. As I've mentioned, we had a bumper crop this year. These are from Victory Park about 100 paces from my house. Just dried and ground in the blender. Needed no leeching. The cookies are SO crunchy. I think cookies need to be, a soft cookie is an abomination in my mind. These might be a little over the top, but they really did turn out lovely. The batch in there now includes the black walnuts I collected a few weeks ago, that took me hours to smash with a hammer on the driveway and pick out of the shells. Talk about slow! At least I didn't pound the acorns by hand this time.

Sunday, October 13, 2013

Scylla and Charybdis: Olives

This year's olive harvest was rather nice.  *Yes, my two little trees are named Scylla and Charybdis, because I planted them a little too close on a slope, so picking is somewhat treacherous. Last year almost the entire harvest was devoted to my mad attempt to press oil by hand. Warning: it can not be done. So this year I tried various cures. They have to be picked before they fully ripen or the bugs get them, though oddly that wasn't the case last year when I had some black salt cured olives too. Well, some were cured as I always do: just brine. Takes a year and a few changes of brine every few months. But they stay firm and vegetal. Far right is one tree's early harvest. The other I slashed, soaked in water and brined in Spanish fashion, which is the quickest way to do it. But the grand new experiment was using lye. LET me tell you; scary stuff. And not easy to find, try hardware stores but not Home Despot. Oh, and Red Devil is now apparently called Rooto. Evil warnings still appear on the label. The proportions in the cure were given to me by Megan Brown (see The Cult of Prepasteurian Food Preservation group on Facebook). I doubled her formula using 2 gallons of water and 8 tbs of lye at 70 degrees F. It covered the olives. After 12 hours I drained and repeated. USE GLOVES!! And goggles. Then rinse for 3-5 days with water draining and rerinsing 3 times a day. I was gone the past few days so it was more like a week. Then it went into strong brine. In one quart jar I added lemon peel, spices and chilies for kicks. They already taste good. A little soft, and I do prefer a bit of crunch, but still, so far a real success. Thanks Megan and everyone else in the Cult for the inspiration.

Friday, October 11, 2013

Food Friday: Watermelon Pickles from Tullie's Receipts

This week I received a wonderful gift in the mail. My friend Lee over at Hunting and Gathering (a blog about 19th and 20th century Georgia photographers) sent me two packages of cookbooks. Receiving this collection of community cookbooks, recipe booklets, and compilations was a great way to start the week.

Photo by Gena Philibert-Ortega


One of the cookbooks she was excited for me to see was Tullie's Receipts. Nineteenth Century Plantation Plain Style Southern Cooking and Living. (Compiled by the Kitchen Guild of the Tullie Smith House Restoration. Atlanta Historical Society, Inc. Atlanta, Georgia. 1976.) What a fabulous book. 

Photo by Gena Philibert-Ortega


The Preface explains:

Tullie's Receipts is not only a receipt book for cooking but also a historical documentation of life in the South during the nineteenth century. It has been created by the Kitchen Guild of the Tullie       Smith House Restoration through research in unpublished manuscripts, nineteenth century           published cook books no longer in print, individual family receipts handed down from generation to generation, newspapers, scrapbooks and diaries..."

Quite frankly they had me at unpublished manuscripts.

So this cookbook is really every genealogist's dream come true because of the rich, wonderful original (and derivative) sources they used. The bibliography attests to this. Below is just one page of it.

Photo by Gena Philibert-Ortega


What's even better than having the recipes is even some copies of the handwriting in the original sources.

Photo by Gena Philibert-Ortega


So needless to say this is a cookbook that I will be studying for awhile. So today I decided to feature the recipe for Watermelon Pickles. 

Photo by Gena Philibert-Ortega


I've never had watermelon pickles, though I would like to try them. Everytime I see them or mention of them I remember a funny blog post from another genealogy friend, Amy Urman from The Genealogy Search. You may want to see what she has to say about her family and watermelon pickles.


Saturday, October 5, 2013

Copy Cat Sparkling Daily Cleanse Probiotic Drink


MY NEW FAVORITE HEALTHY DRINK
quite similar to the "Kevita" Lemon-Cayenne Daily Cleanse...
which, by the way, is about 3.25 a bottle.

i was tired of spending all that $ AND i was collecting way too many bottles.  so...i decided to experiment with the probiotic lemonade recipe i found HERE at Flock in the City.  a few red pepper flakes and fresh ginger did the trick.

PERFECT...

tart crisp vitamin C lemon juice
with probiotic whey...
fresh ginger for a zing that will sooth an ailing stomach after a indulgent meal
AND the spicy red pepper will boost that metabolism.

i'll call this
SPICY LEMON GINGER "AID"


SPICY LEMON GINGER-"AID"
or...COPYCAT LEMON-CAYENNE DAILY CLEANSE 
(probiotic...fermented)

2 cups fresh lemon juice, strained of pulp (10-12 lemons?)
1 cup whey from strained yogurt
1 cup organic pure cane sugar
1 cup fresh grated ginger...washed, but no need to peel
1/2 tsp red pepper flakes
enough filtered water to fill up 1 gallon jug


put 2 quarts filtered water and 1 cup grated fresh ginger in a pot and heat to a boil.  simmer for about 5 to 10 minutes.  turn off  the heat.  add your red pepper flakes while it is hot/warm.  let it all steep for a little while.  taste it.  you might want to strain it before it comes to room temp due to the "heat-spicy" factor....remember, this will have lemon juice and more water added so it can be on the "spicy"side.  then strain it to make "spicy ginger water".

squeeze lemons to equal 2 cups strained juice.

in a one gallon size glass jar (like the one shown) add strained spicy ginger water, 1 cup sugar, 2 cups strained lemon juice and 1 cup whey.  stir until sugar is dissolved.  now add enough filtered water to fill the gallon jar...leave about 1 1/2 to 2 inches, as shown in photo.  i like to cover the top with a double layer of saran and clasp down the lid WITHOUT THE RUBBER GASKET.  this leaves it "almost airtight" but allows air to escape if necessary so that it will not run the risk of exploding due to the carbonation from fermentation.
leave this out on the counter...not in direct sunlight.  it should take 3-4 days in the large jar.  i like to stir it once a day.  after the third day you will see some action...some bubbles.  this is good.  give it a little stir.  now strain this through some cheesecloth into some airtight bottles (lock-top) that are made for carbonated drinks.  i use a ladle  and a funnel because the one gallon jar is very heavy and awkward.  straining is not absolutely necessary, but it keeps the drink a little more clear of the "white cloud" that can settle at the bottom.  i like to use Grolsch Beer bottles or the 32oz lock top bottles.  leave the filled bottles out for another day or two.  check one after a day and see if you have THE FIZZ FACTOR.  open carefully.  be sure to move these to the fridge.  this will definitely slow any further fermentation and carbonation.  the weather can be a factor.  my bottles take a few more days on the counter when it's cooler.
NOTE...i have left some bottles on the counter for an extra 3-4 days to get some good fizz action.  sometimes i get more fizz if the bottle has been in the fridge for a week.  sometimes i get more fizzz from the larger bottles.  sometimes i get fizz in a reused glass "kevita" bottle.  it all has to do with the sugar content, the ripe lemons, the weather, the timing, the bottles etc....

FINAL NOTE...i am fairly new to this.  i am not an expert.  this recipe and method works very well for me.  if you have any questions i will answer them in my novice way, but please google around for more safety issues and or further information.  try the lovely bloggers at Flock in the City and Food Renegade.  also...if you have any input or tricks of the trade...i would love to hear it.


example of locking top covered with a double layer of saran...NO rubber gasket.  this makes it "almost air-tight", but allows pressure to release so there will be no explosions.

Friday, October 4, 2013

Food Friday: Luncheon

Who doesn't like a luncheon? Typically a community cookbook has individual recipes and sometimes a few menu plans. But in the case of the Maturango Museum Luncheons Cook Book (Ridgecrest, California 1981), it's all about the luncheon.


The first pages of the cookbook include a history of the luncheons that ran for two years in the early 1970s. Luncheons were a fundraising effort for a building fund for the museum. I would think that any fundraising from the subsequent cookbook was a success since my copy is the fifth printing done in 1981.


This cookbook doesn't include names with each recipe, but we do get some names in the acknowledgements that probably represent many of those who submitted recipes.


Each page or two is a different luncheon menu with the date included. For Food Friday I'm including the complete menu for May 19, 1975 which includes some of my favorite foods, Chicken Salad and Deviled Eggs.


Royal Raspberry Ras el Hanout Truffles


TRUFFLES...

not always the perfect sphere,
but guaranteed smooth chocolaty decadence.

take the short cut and make truffle squares...
no need to slave over a messy chocolate bowl with latex gloves and rolling into perfect little balls.
i've made so many little truffle balls in the past year or two that i've lost count.  it's the rolling, the mess and the clean up i don't look forward to...so i decided to pour the mixture in a flat pan, cut them into squares, dip them in cocoa and call it a day.


ROYAL RASPBERRY
RAS el HANOUT
dark chocolate truffles

say that 3x's fast ...

RAS el HANOUT...a Moroccan spice blend usually containing coriander, cumin, cardamom, fennel, cinnamon, all spice, turmeric, paprika and black pepper.  it does vary a little bit from region to region, spice vendor to vendor.
i found my Ras el Hanout at Mother's Market.  if you can not find a Ras el Hanout blend, try the spice shop called "Savory" or you can make it yourself.  this recipe from Wiki-how(link) is similar to the one i have.
ROYAL RASPBERRY ?...an extract i have found very useful at Surfas.  it read on the bottle "for chocolate" so i snatched it up.  it's much better than your regular store bought raspberry flavoring.

FREEZE DRIED RASPBERRIES...crushed to a powder consistency in a spice blender for the exterior.  they look like THIS found at Trader Joe's.  for these truffles i chose to dip the top only.  i found that handling them fully coated is a bit of a "red" mess for the consumer.  then i dipped the sides and bottom with good cocoa powder....who doesn't mind a little cocoa powder fairy dust?...


i make small batches.  just enough for all my pals to get 1 or two.  this small recipe is just enough for about 24 nice bite size squares.


ROYAL RASPBERRY RAS EL HANOUT TRUFFLES

9.7 oz good 61% dark chocolate, chopped into tiny pieces
1/2 cup plus 3 TBSP coconut milk
2 tsp ras el hanout spice blend
1/2 tsp, plus a few drops of "royal raspberry extract"
freeze dries raspberries, crushed or whizzed into a powder
 and cocoa powder for dipping
(NOTE...coconut milk for dairy free, but can use heavy cream)

prepare a small square/rectangle dish or tupperware.  use something with a flat bottom.  mine is 8 x 5 inches.  lightly spray the inside, then line it with heavy saran or just use regular tinfoil.  make sure you have over-hang for easy removal.

chop chocolate in very small pieces...set aside in glass bowl. 
heat coconut milk with ras el hanout in a small sauce pan
NOTE...i put an extra tablespoon of milk in due to the straining.
heat the milk to just a boil.  strain directly into and over chocolate.  let sit for a moment.   i wrap a kitchen towel around the bowl to keep the chocolate mixture cozy when gently stirring the ganache.  start stirring from the middle.  the ganache will start to come together.
when the ganache looks nice and glossy and there are no visible lumps you can get the hand whisk out.  lately i have found that after everything is smooth and creamy a good hand whisking is in order to fully emulsify the fats...see notes below.  when you are satisfied with the consistency, pour into prepared dish.   tap on the counter a few times to even it out.  refrigerate until completely set.  should only take about 30-40 minutes.
remove by lifting out in one piece holding the saran.  cut into squares and coat in powdered raspberries and cocoa.  if you store them in the fridge they will darken as shown, but can handle room temp for a day or so, covered.
NOTE...quite often my coconut milk ganache seems to "break"...this means it is not absolutely glossy after it is combined and will result in a grainy truffle texture...you DO NOT want this.  i can now recognise it right away.  if this happens keep whisking to emulsify until glossy.  if you don't notice it until after it has set, don't worry...just cut block into small squares and reheat over a double boiler...then whisk until fully emulsified. and pour into another prepared dish.

Tuesday, October 1, 2013

Urban Forage

The term urban foraging means many different things. To some, it's anything in a city that overhangs a public street, whoever owns the tree. To others it means dumpster diving. In Stockton, it means finding public spaces where there are things most people don't think of as food. And get them before the critters do. (Though leave some for them too.) This was a bumper year for acorns and I took maybe 50 pounds of huge beauties just down the street at Victory Park. And this day's forage was for black walnut. A huge bag. I'm still not sure how to open them. But along the way there were some nice olives off March Lane. Some Carob on Rosemary Lane. Some walnuts on the levee before you get to I-5. They were so good roasted with cinnamon and sugar. And a few bitter almonds, with which I like to tempt fate. Fall really is nut season. And how nice, one of these days my little book on NUTS will come out in Reaktion's Edible series. I wrote it a couple of years ago now. GRRR. That's my squirrel impersonation.