Saturday, September 28, 2013

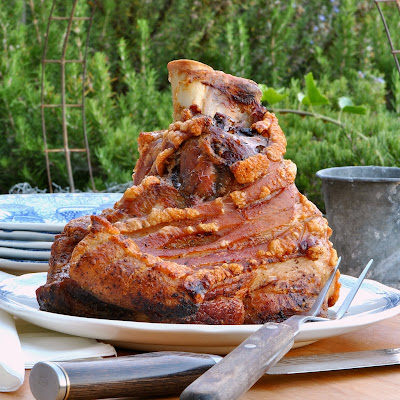
Slow Roasted Bone-in Pork Butt with CRISPY SKIN Fat Cap


"A PICTURE SAYS A THOUSAND WORDS"
but i'll add a few more...

slow roasted, unctuous fall-off-the-bone tender, pull apart pork butt-shoulder-picnic roast.

COMPLETELY COVERED IN CRISPY SKIN

it might take all day, but it is so worth the wait.  there's not much work to it and it will surely be a big hit at your next gathering.

put this baby in the middle of the table...
say, "ready-set-GO"


I CAN'T PASS UP THE $6.00 - 6 LB. PORK BUTT
i'm a big fan of the 8 hour pork roast while you sleep...
BUT...i found a very interesting and informative post about crispy skin roasted pork shoulder.  same concept with one very important extra step...CRISPY SKIN!  
many thanks to Kenji Lopez at Serious Eats for breaking down the science of "the crispy skin" in a way that most of us can understand.
below is a direct quote and just a snippet of information from   J. Kenji Lopez-Alt.  he is the Chief Creative Officer at SERIOUS EATS.

"When roasting at 375°F, because the dehydrating and protein-setting is taking place at the same time that the connective tissue is breaking down, there's never really a stage when the skin is relatively structure-free. It goes from being firm through connective tissue directly to being firm through dehydration.
On the other hand, after 8 hours in a 250°F oven, the pig skin has very little structural integrity—there's really very little holding it together and it closely resembles a bundle of tiny balloons just waiting to be filled.
How do you fill those balloons? Let heat do the work for you."


SLOW ROASTED BONE-IN PORK BUTT WITH CRISPY SKIN FAT CAP
this slightly adapted recipe is from J. Kenji Lopez-Alt at SERIOUS EATS

5 to 6 lb pork shoulder BUTT 
kosher salt
fresh ground pepper
cumin
chili powder
2 onions, sliced thick
8-10 cloves garlic

preheat oven to 250F.  prepare a baking dish/roasting pan with extra thick aluminum foil.  lightly oil the aluminum.  i have had one stick to the foil, so now i oil.  lay the onion slices and garlic cloves out for the roast to rest on. 
start with a pork butt bone-in, skin-on...butt should have a "fat-cap".  rinse the meat and dry well with paper towels.  


to score the skin...or not to score the skin...

i chose to score the skin.  as you can see, i did not do a beautiful job, butt i was not going for the "show case shoulder".
there are no exact measurements for the seasoning...just season the whole piece.  i suggest you do this over the sink and rub the seasoning all over.
place the butt on the prepared onion/garlic roasting pan.
put in oven for 7-8 hours.  pork should be done when fork tender.  OR...as the original recipe states...insert a knife.  if you can easily turn the knife around in the meat, you are ready.
remove pork from the oven.
tent and let rest for 20 minutes.

above is what it looks like after 7 1/2 hours at 250F
before crispy skin stage.

CRISPY SKIN STAGE...
crank the oven up to 500F.  you might want to move the cooked butt onto a rack or a clean piece of oiled aluminum foil pan. so as not to burn the onions, garlic and drippings.  put pork in HOT oven and watch for the skin to crisp up.  you might want to rotate the pan a few times for an all over crisp.  watch carefully.  it can go from crisp to burnt in a matter of minutes. 
remove from oven when it is good and bubbly crispy looking.  let rest for 15 minutes and...

DIVE IN!

NOTE...my "butt" was tender, but meaty.  it fell off the bone, but was not oozing-ly juicy.  i was wondering if the super slow roasting renders out more fat than a higher temp.?...or was it that i got a lean butt.  not to worry...
this is FABULOUS...beyond.
sorry to say, i did not have a party of people to serve, but what a show stopper!  i ate my fill of crispy skin and pulled pork... i bet i could have devoured the whole thing, but i put a few large pieces in the fridge wrapped in parchment in a large tupperware.
the next morning i was able to re-crisp the skin and get some lovely slices off the larger chunks.

SO...this saves and serves well for the next few days.  the skin WILL re-crisp (with care) in the toaster oven.


Friday, September 27, 2013

Food Friday: Chinese Egg Rolls from New Jersey

From the collection of Gena Philibert-Ortega


Today's Food Friday is from a community cookbook that has a similar look to another one I own from Vermont. From Ridgewood Kitchens sponsored by the Women's Guild of the West Side Presbyterian Church Ridgewood, New Jersey, 1945 has a metal coil binding and uses handwriting and drawings to illustrates recipes.  As I scanned the recipes contained in this cookbook, its age shows since some of the drawings are caricatures of various ethnic groups.

From the collection of Gena Philibert-Ortega


Interestingly, there is a very small notice on the title page that states "This Third Edition Is Produced in Full Compliance With The Governments Regulations For Conserving Paper And Other Essential Materials."

The beginning of the cookbook includes a drawing of the church and a six page history.

From the collection of Gena Philibert-Ortega


Today's recipe I am including because it not only has the woman's name (in this case her married name, Mrs. Walter A Dodds) but her city and state, she is from Laramie, Wyoming. Like many "Chinese" recipes of this time period, the end result is a little off. In this case it seems more like an omelet than an egg roll.

From the collection of Gena Philibert-Ortega


This cookbook has some great stuff in it including a recipe from Cuba and the ads. Oh the ads. Everything from "scientific facials" to the local cemetery. We will revisit this cookbook again.

Do you have any similar looking community cookbooks in your collection? I'm curious whether the drawings were clip art that the cookbook editors chose to go with each image. I haven't had time yet to compare the two I own.

Tuesday, September 24, 2013

Quick Vanilla Buttercream Frosting with White Vanilla Bean Cake


actually this is a ....

double layer...
WHITE VANILLA BEAN CAKE
DARK CHOCOLATE GANACHE filling
with CANDIED MACADAMIA
and...QUICK WHITE VANILLA BUTTERCREAM FROSTING

whew...that was too much for the heading.


a lovely cake for any occasion. small crumb, similar to a pound cake, but not too heavy.  holds up well and has a nice vanilla bean flavor.  the frosting is key...THIS BUTTERCREAM RECIPE IS FABULOUS.  the first one i ever made and it came together perfectly.   REALLY...this is delicious and EASY.
the dark chocolate ganache counterbalanced the plain whiteness of the over all flavor and appearance.  it slices well and it's fairly easy to put together.  i will add that the chocolate shavings were supposed to be lovely chocolate curls...this is not an easy task.  i think i tried 3 or 4 times before i finally just went with the pile of shavings...i think i'll need a little more practice on the curls. 


WHITE VANILLA BEAN CAKE

100g butter
1 cup sugar
2 eggs
1 1/2 cups flour
1 tsp baking powder
1/8 tsp baking soda
3/4 cup buttermilk
2 tsp vanilla paste

preheat oven to 360F.  butter a 9 inch cake pan and dust evenly with flour.
in a separate bowl mix the flour baking powder, baking soda, set aside.

in a big bowl place butter and sugar and beat until fluffy.  beat in eggs, one at a time, beating well after each egg.  when the buttery mixture is creamy, add 1/2 of the flour mixture and mix.  then add the buttermilk, mix again.  finally add the other 1/2 flour mixture and beat until creamy.  beat in vanilla until Incorporated.   this sounds like A LOT of mixing, but try not to over mix.

pour mixture into prepared pan.  bake for approx. 35-40 minutes.  mine took 30 minutes because i used a Fat Daddio's light cake pan.  check with skewer inserted in the middle of cake...should come out "just" clean.  remove from oven, let cool for about 10-15 minutes and remove from pan.  cool completely before frosting.


NOTE...if dividing into 2 layers you might want to refrigerate for just a bit before slicing in half.
ALSO...if you do not have a cake stand...IMPROVISE.  it is much easier to slice a cake in half when it is elevated off the board.  i used an upside down tupperware.  the taped napkin helps the cake stay in place and less likely to slip off.   use a long thin blade and score the outside, then slowly move your knife in towards the middle and around, watching that you are hitting your marks where you scored the cake.
PS...i also frost the cake on this lovely improvised cake stand.


QUICK VANILLA BUTTERCREAM FROSTING
found at foodnetwork.com by Gale Gand

3 cups powdered sugar...sifted, 306 grams total
1 cup butter, cubed, softened
1 tsp vanilla extract
1 to 2 Tbsp whipping cream

in a stand mixer fitted with whisk, mix together sugar and butter.  mix on low speed until well blended, then increase speed to medium and beat for another 3 minutes
add vanilla and cream and continue to beat on medium for 1 minute more, adding a little more cream if necessary for a spreading consistency.  i think i added about 1 Tbsp total.


DARK CHOCOLATE GANACHE FILLING
with candied macadamia
NOTE...  there IS enough frosting to fill the center as well as cover the cake, but i didn't want a plain white on white cake.  this was something i added in at the time of building the cake.  i had some left-over ganache from plain truffles.  i crushed some candied macadamia nuts and added it to the left over ganache to make the filling.

this is approx. what i had.  you will probably not use all of it...get a spoon and finish it off, make a few truffles or use it for "drizzle sauce"
6 oz dark chocolate
6 oz heavy whipping cream

prepare your ganache...put chopped chocolate in a heat proof bowl and set aside.  heat cream to a boil.  remove from heat and pour over chopped chocolate.  let sit for a minute.  begin stirring gently from the center.  you will see the ganache come together.  when it is fully incorporated, refrigerate until good spreadable consistency.  add nuts or whatever.  hmmm, maybe crunchy toffee chips?  you could use just ganache.

Friday, September 20, 2013

Food Friday: Working Mothers' Casserole from the LA County Fair


Ok, true confession time. Many years ago I won a few blue ribbons for some flavored vinegars I submitted to the Los Angeles County Fair. So you can imagine my excitement when I came upon today's cookbook at a library book sale. While this was prior to my fair winnings, I love the idea of a cookbook that includes all of the award winning recipes. Each recipes includes the  prize awarded, names, and cities.

Today's cookbook is the Los Angeles County Fair Award Winning Recipes 1988. Compiled by The Home Arts Department.

For today's recipe I chose one of the winners in the Working Mothers' Casserole category. This recipe includes an ingredient from my childhood, canned tamales.


In case you have a hankering to go to the Los Angeles County Fair to eat some fair food and gaze at prize winning entries, the fair runs for another 9 days. Check it out at their website.

Saturday, September 14, 2013

Funky Dust Pickle Powder

Who could have ever guessed that I would get turned on by machines? Not for their own sake of course, but to manipulate traditional foods in new ways. I had this idea the other day: what would happen if you took lacto-fermented pickles, shaved them thin and put them in a dehydrator? Then crush them up into a powder to use as seasoning. It is delicious beyond all expectations. This is two of my cucumber pickles made in late July, super sour, no garlic a little chili. They yielded about a tablespoon of this funky dust. It's intriguing, not overly salty, but sour, spicy, slightly sweet. My first instinct would be to put it on a mango, but sprinkled on a burger would be a little more conventional. There's also a batch of bright yellow fermented sweet corn dehydrated that is even more intriguing, very sweet, sour and salty. Again, I'm thinking relish, but even just a pinch on a salad, sandwich, or maybe in the batter for fried chicken. Next experiment is beets, okra, radish - just what I happen to have around. Any other ideas?

Friday, September 13, 2013

Greek Yogurt Lemon Tart with Rosemary Almond Crust


SWEET
TART
CLEAN
REFRESHING
GLUTEN FREE


sweet tart lemony citrus desserts are so refreshing especially this lovely tart with it's little rosemary kick.
i seem to forget about lemon desserts.  they get pushed aside for the dark chocolate, the savory peanut butter and the gooey caramel goodies.  i often post about bacon, chocolate, pig ears, pork belly and various decadent sweets and savories, but i bet you'd never guess... i actually DO eat a lot of yogurt, egg whites, grilled fish, steamed vegetables, aloe vera, kombucha, blah blah blah...
i call it my "yin and yang theory".
a little good and a little bad keeps everything in balance.

but...about this recipe...
i'd say it weighs in on the "good for you" side.  i found the original lemon rosemary tart on pinterest at Good Things Grow and pinned it to my "must-try" board.  i finally got around to it, but wanted to make a gluten free crust.  i am not gluten free, but i love to experiment and i have a few gluten free friends.
the original almond crust comes to you from Flourishing Foodie.  i love the almond flour crust idea so i just added the fresh dried rosemary...delicious.  the crust was crisp out of the oven and would be perfect served the day of, but alas...i needed to shoot the tart the next day so i stuck the finished product into the fridge.  the crust lost it's crunch, but was still a winner.  i would compare it to a cheesecake style crust.  it holds up and slices well, but got a little moist after refrigeration.  solution?...i added some crispy lightly toasted almond slivers to the servings and "voila"...the crunch was back in the mix..


Rosemary Almond Crust
Gluten Free
almond flour crust original found at Flourishing Foodie

2 cups almond flour
2 Tbsp granulated sugar
pinch of sea salt
1 1/2 tsp fresh oven dried rosemary
1/4 cup unsalted butter, chilled and cubed
1 egg white
1/2 tsp vanilla bean paste

preheat oven to 400F.  lightly butter a 9 inch tart shell.  i used a silicon pastry brush.

in a food processor add almond flour, sugar, salt, rosemary, butter, vanilla bean paste and egg white.  pulse until all ingredients are combined and start to stick together, resembling coarse meal...do not over blend...it will get mushy and ball up.

put mixture into tart shell and press out with your hands and form up the sides of the shell.  create an even layer.  i used a flat glass to lightly tamp  it down.  it will seem quite thin, but will cook to a nice crust as shown.

bake on middle rack for 15-20 minutes, or until it is light brown.  remove from oven and cool completely.


GREEK YOGURT LEMON VANILLA BEAN CUSTARD FILLING
original found at Good Things Grow

1 cup plain greek yogurt
1/2 cup sugar
2 eggs
1/2 cup lemon juice
1 to 1 1/2 tsp lemon zest
1/2 tsp vanilla bean paste

preheat oven to 350F
place yogurt, vanilla bean paste and sugar in a medium bowl and whisk until thoroughly combined.  whisk in the egg, one at a time, then add the lemon juice and zest.  whisk until completely smooth.

pour into prepared tart crust.  i poured as much as i could and only had 1-2 Tbsp left over.
BAKE at 350F for 25-30 minutes or until the center is set and only slightly jiggles.  mine was in for 28 minutes and i could have pulled it at 26 minutes.  as you see i had a few cracks, but it was not over cooked.

allow to cool completely.  stick it in the fridge for just a slight chill and a complete "set"...i refrigerated mine over night and the crust got a little moist.  it resembled a graham cracker crust, but still delicious.  i think it would be best to slightly chill and serve the day of.  this tart served very well.  it might be a bit more crumbly (not a bad thing), yet...crunchy and crisp if served the day of.

Tuesday, September 10, 2013

Boy Meets Atlas


I knew there would come a day when my younger son Mookie would figure out that I haven't exactly been telling him the whole truth and nothing but the truth about pasta. He got very good at rolling out dough by hand in most shapes, including a very decent lasagne. But somehow he figured out that there is a machine on the shelf. And a wooden board that slides out from under the counter, onto which a hand cranked pasta machine fits perfectly, as the Gods of dough ordained. It took him just a few minutes to figure out how to work it and he rolled out these sheets of such exquisite delicacy and grace, that when they went into a simple round cassola with fresh tomato sauce, a little ricotta and mozzarella, he even tempted his mother the raw vegan into a hefty serving. This was not my doing, but look at it. It IS in fact as good as lasagne can possibly get. I told him next time we make the cheeses too. Only way to go from there is grow the wheat and tomatoes and milk the cow. I am there. Can there be anything better than this for dinner?

Friday, September 6, 2013

Food Friday: Death by Chocolate

It has been HOT and humid here in Southern California. So my general feeling is that it's better to make reservations during this time of extreme weather than to actually cook. But when I saw this recipe I thought I wouldn't mind someone making this for me.


Today's recipe comes from American Buffet. Favorite regional recipes from members of the General Federation of Women's Club. (1993). This cookbook is everything I love, regional recipes and historic women's clubs.

And then there's chocolate....


Thank goodness for Gladys O. Smith for showing us the true beauty of a community cookbook, chocolate recipes.

Thursday, September 5, 2013

Flourless Chocolate Cake with Dark Chocolate Ganache and Candied Bacon


MY NEW FAVORITE FLOURLESS CHOCOLATE CAKE

i now believe i found the perfect flourless chocolate cake.  as stated before in previous posts...most all flourless chocolate cakes are going to be delicious...that's a given, BUT most are very difficult to serve.  i usually end up with little chocolate crumbles on me, the table, the floor.  chocolate mess is not a bad thing, but i like the presentation to look as good as the cake will taste.

THIS IS A SPECTACULAR CAKE

smooth, rich dark chocolate
fudgy, yet light
not overly sweet
a perfect canvas for extras
serves like a charm
gluten free
a definite crowd pleaser


the original recipe comes from Gourmet Magazine, Nov. '97.
i decided in my usual fashion that it needed a little something extra.  i can't help myself.
Guittard dark chocolate
vanilla bean paste
a little espresso
a sprinkle of cinnamon
and, of coarse...a pinch of chipotle

oh...and don't forget
THE CANDIED BACON !


CLASSIC FLOURLESS CHOCOLATE CAKE
with a spicy Mexican twist
original from Gourmet Magazine Nov. '97

for the cake...

4 oz dark or bittersweet chocolate, chopped small and evenly
(i used Guittard 61% coverture discs)
1/2 cup butter
3/4 cup sugar.   i used super fine sugar
3 large eggs
1 1/2 tsp vanilla extract
1/2 cup good cocoa powder, again...i used Guittard
1/2 tsp(slightly rounded) cinnamon
1/4 tsp ground chipotle powder
1 tsp powdered espresso

preheat oven to 375F.  line an 8 inch cake pan OR i used an 8 inch spring form pan.  line the bottom and sides with parchment and lightly butter or grease the parchment.  the sides might not be necessary, but that's what i did.
in a small bowl add the cocoa powder, cinnamon, espresso and chipotle. whisk to combine and set aside.
in another small bowl add the chocolate and butter.  use either the microwave or a double boiler to slowly melt the chocolate/butter until smooth and shiny.
pour warm chocolate mixture into medium mixing bowl with the sugar.  whisk to combine well.  now whisk in eggs one at a time, waiting until each has been fully incorporated to add the next.  add the vanilla.
sift cocoa powder mixture into the chocolate mixture and whisk until WELL combined.
pour into prepared pan.  bake for approximately 25 minutes.  i turned the cake after 15 minutes.  start watching after 20 minutes.  mine took about 23 minutes.  toothpick should come out clean with moist crumbs attached.
allow cake to cool for 5 minutes.  if necessary, run a knife around the edges and invert onto serving platter.
NOTE...since i was going to ganache the cake i inverted onto a piece of parchment on a cooling rack.
let cake cool completely.


for the ganache...

6 oz good dark chocolate, again Guittard 61% coverture discs
6 oz heavy cream
1 tsp clear corn syrup

prepare your cake for ganaching...choose your "nice side", either the top or the bottom.  put cake on an 8 inch round that you will serve off of.  use cardboard or i used the removable 8" bottom from a tart pan.  set cake on a rack over a sheet pan to catch the ganache "fall-off".  you will want to save this for truffles or just a big spoon-to-mouth.
chop chocolate into even small pieces and set aside in a glass bowl.  (i like to wrap a kitchen towel around the bottom to keep the working ganche cozy).  warm cream and syrup in a small sauce pan until just a boil.  pour hot cream over chopped chocolate and let sit for 1 minute.  begin to gently stir from the middle.  take your time, you will see the ganAche magically come together.  now stir to fully incorporate and there are no lumps and it is nice a shiny.
pour warm liquidy ganache over cake...starting with a pool in the middle and spiral out wards.  work fairly quickly so it does not set.  pick up the cake and jiggle the ganAche so that it covers the whole top.  it is a messy job, but you will get the hang of it.
DO NOT go back and try to fix the top, but you can gently add to the sides where the chocolate might have missed while dripping off.
add chopped CANDIED BACON in the middle for appearance or all over for pure indulgence.   NOTE that the bacon does not make for a clean slice, but i'm sure you can work around it.  LOL !
let cake sit  to set undisturbed until serving.  you may refrigerate, but you must take it out of the fridge at least an hour or two ahead so that the condensation from temperature change slowly disappears.


for the CANDIED BACON....

preheat oven to 390F convection.
this can be done the day ahead, but you will need to re-crisp the bacon in the oven before using.  line a cookie sheet with heavy duty aluminum foil.  lay out as many pieces of bacon you can...extra will disappear before you can get it on the cake.  set timer for 15 minutes, but don't go far the first time trying until you get it down.  remove from oven and pour off excess fat into a heat safe glass dish...you might want to save the bacon fat as I DO to use for "bacon-butter".  flip the bacon.  sprinkle the slices with brown sugar, cinnamon and chipotle powder or chili powder or cayenne if you want some heat.  put back in the oven until good and crispy.  remove from oven and let cool on wire rack.  if it is not crispy enough when cooled...put them in the oven on the wire rack and watch carefully...do not let them burn.  save in air tight container with parchment.  if using them later you might want to re-crisp them a bit.